C++ Devlog 1
Installing C++ and WSL in VS Code..
This will be a way to journal down my learning process for C++ kind of like a dev log. I will be logging down all the issues I face and the reasoning behind some of my decisions. Since this is my first post, there’s a lot for me to learn about writing and the platform itself. But one baby step at a time.
Why use WSL and VS Code to install C++?
- So that I can play around for a feel of Linux style cross-platform dev experience. Hopefully, I’ll become more familiar with it since I rarely get the chance to use Linux at work.
- Once I am ready, I plan to put my code to my home server (to be setup later).
- My professor used to recommend this route and I did a whole semester in this way. (mainly I think he want to cater the materials to both the mac’s and window’s users)
Where to get started?
We’ll begin with the official VS Code documentation: Using C++ and WSL in VS Code.
Setup Linux environment
The first step already gave me an error — partly because I didn’t read the instruction carefully. (Lesson: good programmer should first be good at following instructions!)
So I decided to follow the documentation on installing Linux on Windows with WSL, instead of using the Microsoft Store.
*I had another bad experience of it when using it to install python too, so just avoid it, do it properly.
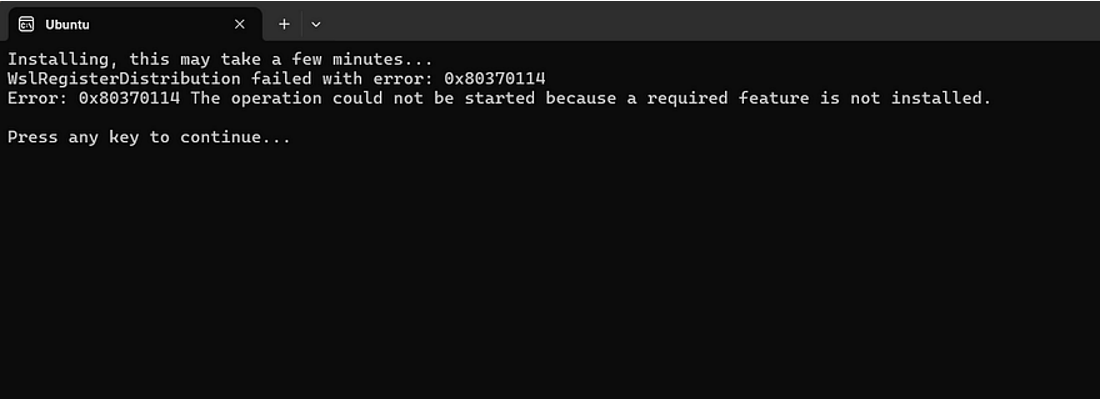
I will just use the default Linux distro (Ubuntu) that comes with the following command
wsl —install
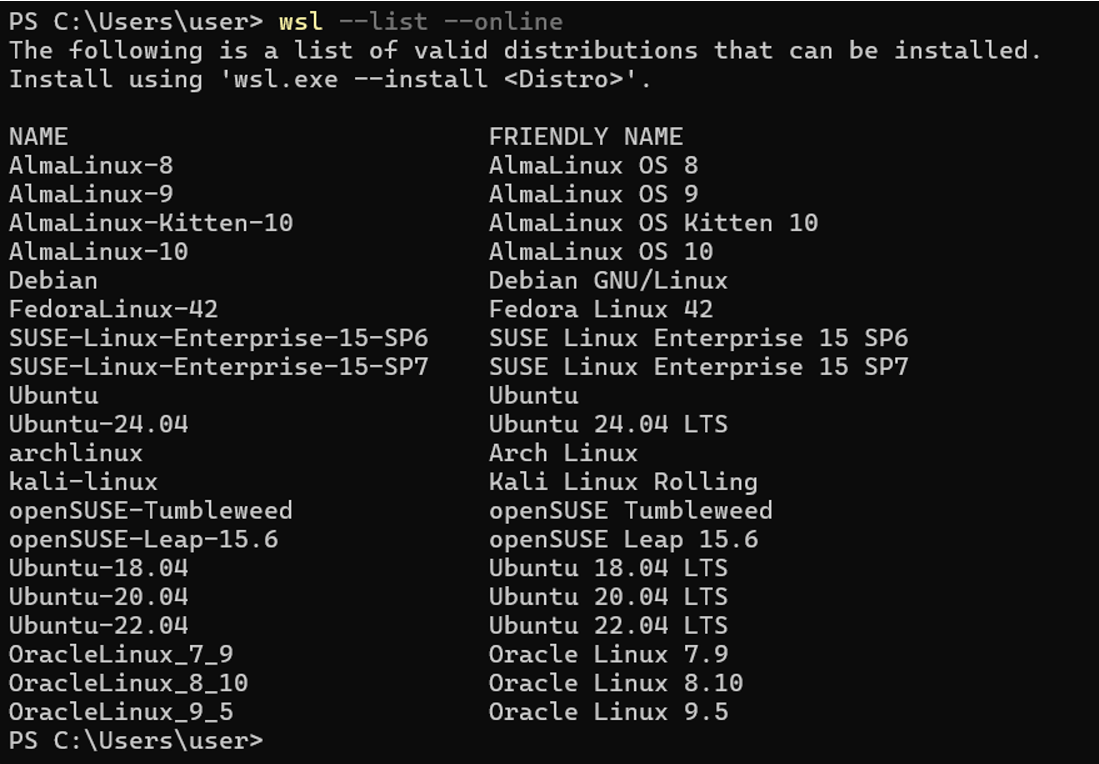
Alternatively, as suggested by the documentation we can use the wsl — list — online to see what other distro we can play with.
Virtual Machine Platform and WSL feature issue
Alright seems like I get another error here. Which I think is due to some virtual machine platform feature not enable and also to allow Linux distro to run on windows.

Open PowerShell as Administrator and run the following then restart
dism.exe /online /enable-feature /featurename:VirtualMachinePlatform /all /norestartdism.exe /online /enable-feature /featurename:Microsoft-Windows-Subsystem-Linux /all /norestart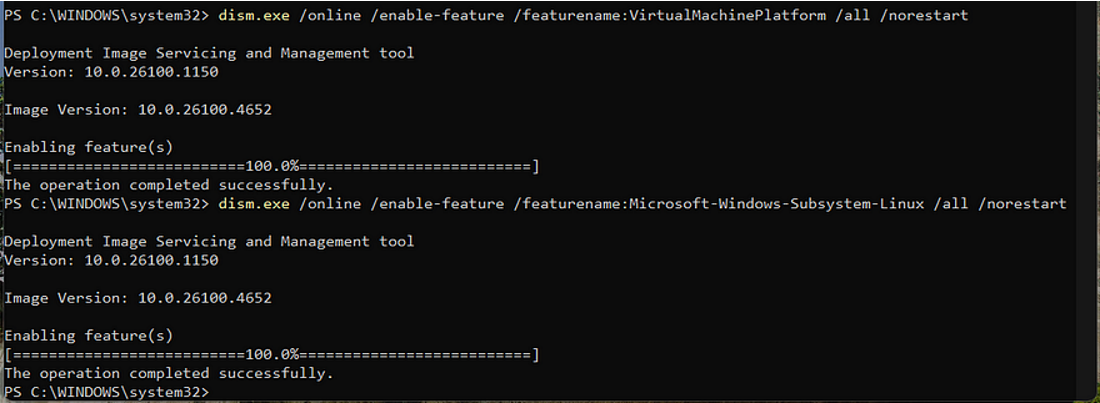
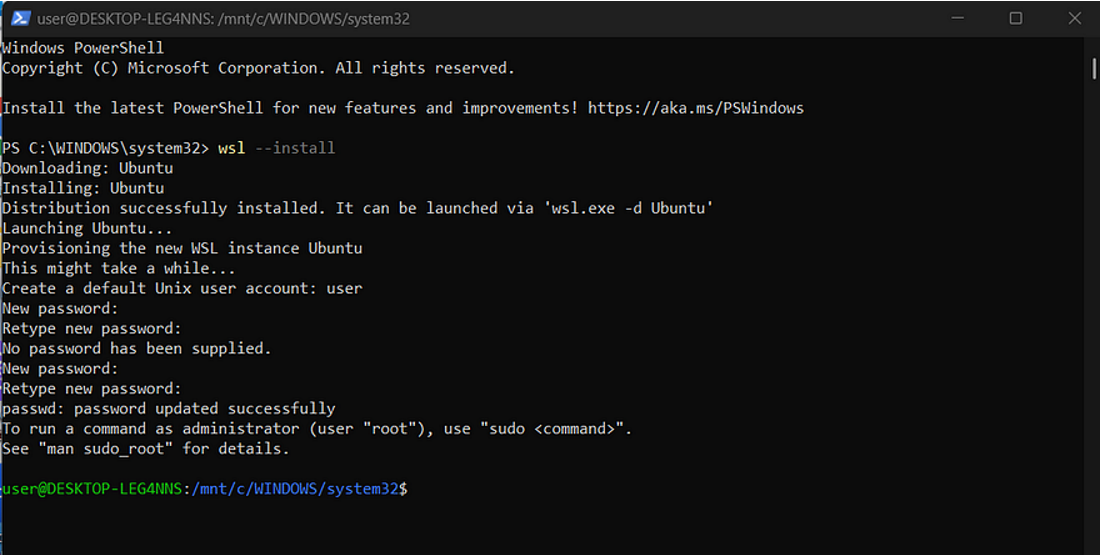
After restarting, I reran the install command, and this time it worked!
Note
When setting up your password in Linux, nothing will show on screen — this is called blind typing. It’s normal. The account will also be the admin account that can run sudo (Super User Do) commands.

Install VS Code
This should be quite straight forward, simply download and install.
VS Code Extensions
Install the following extensions as the title suggests.
Remote Development extension pack
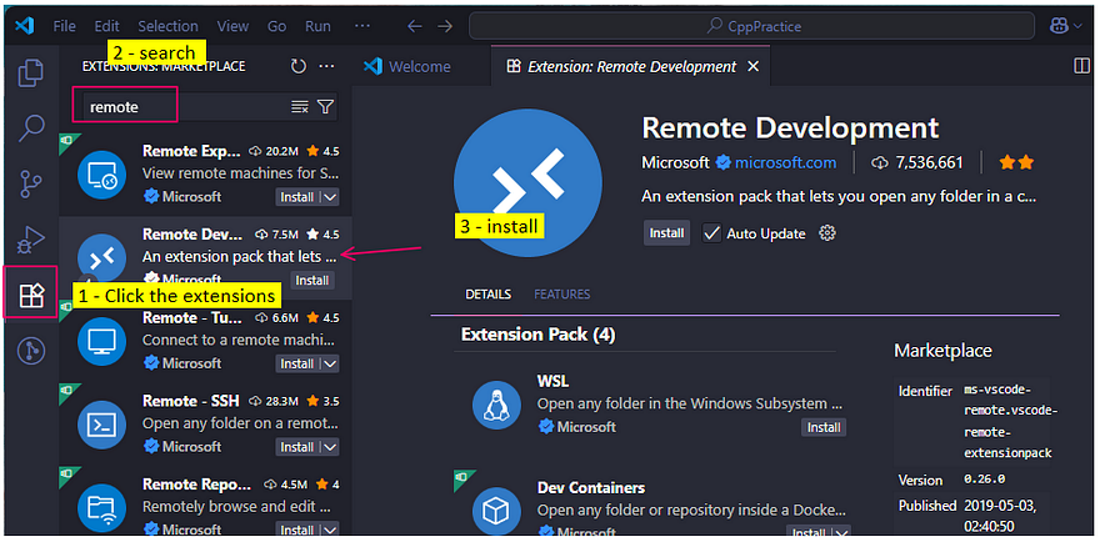
Before we start installing more tools, update the Linux distro to the latest package. Follow this link to update. One thing to note is that WSL extension splits VS Code into a “client-server” architecture with the client (our UI) running on our Windows machine and the server (our code, git and plugins, etc) running “remotely” in our WSL distribution. AKA we have to install our local (window’s) extension into WSL.
LOCAL and WSL have their own extension list
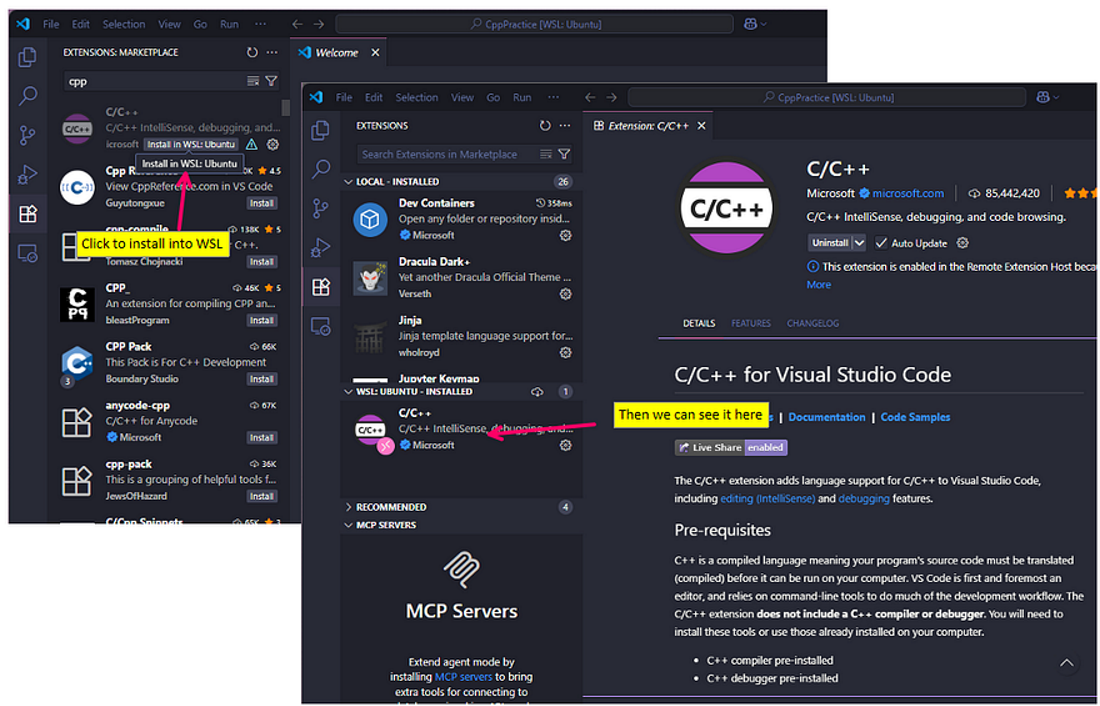
Install the relevant extensions into WSL.
Opening WSL project in VS Code
There are a few ways we can access the folders in WSL.
-
Using the distro command line
Open the distro command line (for me, it would be Ubuntu) > then use
code .to open the VS code in the Linux. But this also means it will open the default folder, for me, its/home/user. So we could simply create the project directory likeTerminal window mkdir cpp_practicecd cpp_practicemkdir helloworld -
Using Windows files system normally to navigate and create our project folders.
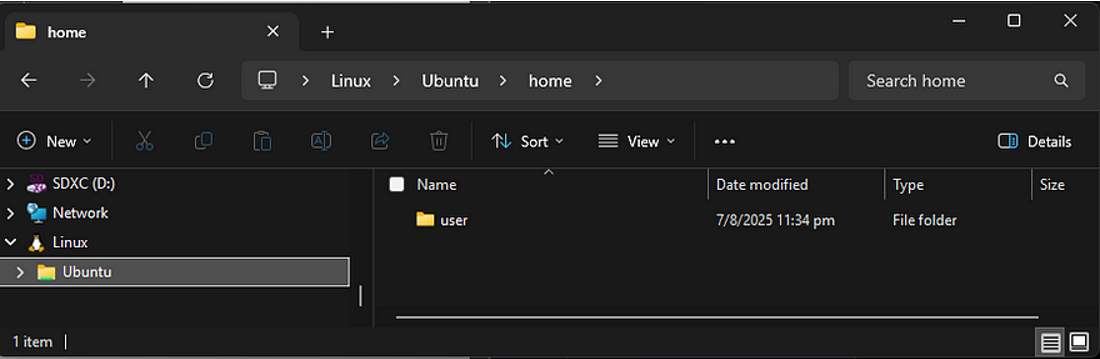
-
Directly use VS Code
Create the project folder then use ctrl + shift + p to open folder in WSL and put in the path in my case is home/user/cpp_practice
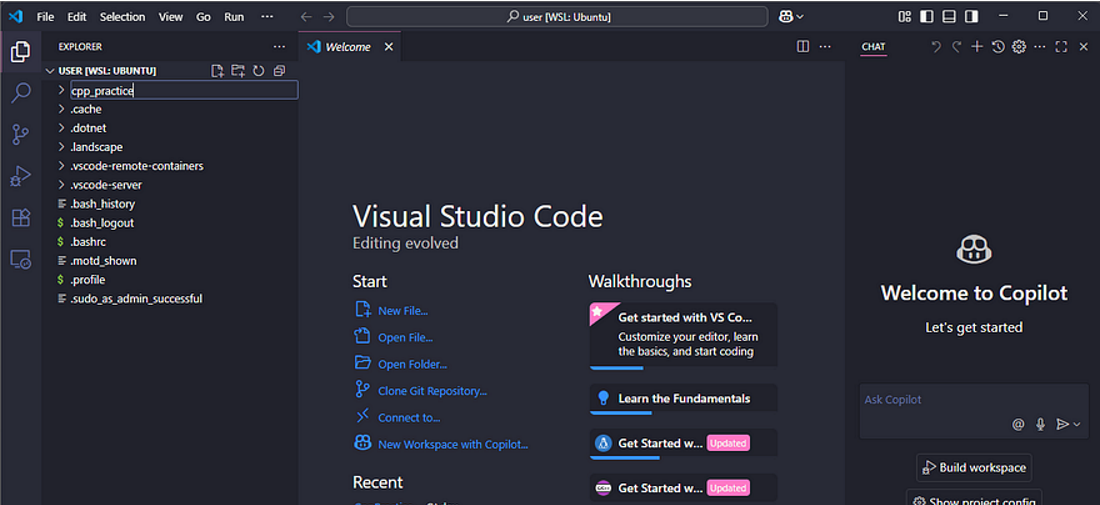
create project folder in home directory (or which ever we like using vs code or command line inside vs code)
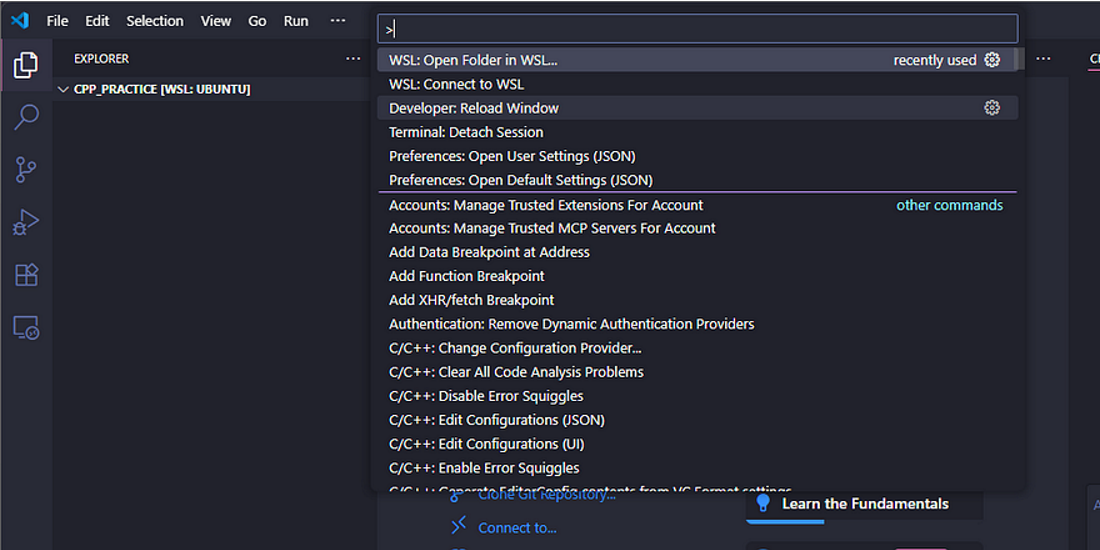
Then we can open the project directory
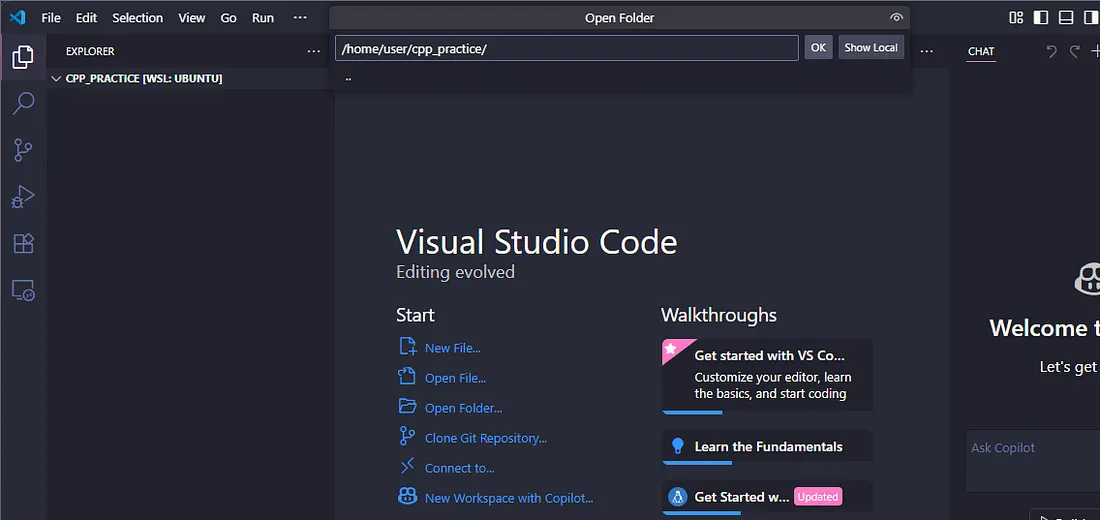
input existing project directory only
Installing compiler
We install by typing into the command the following. It will ask for password for admin we setup up earlier and permission to continue. Just press Y and continue (like arguing with your partners, just agree and move on).
sudo apt-get install build-essential gdbAfter installing, we can then check if we can locate the compiler and debugger with whereis g++ and whereis gdb.
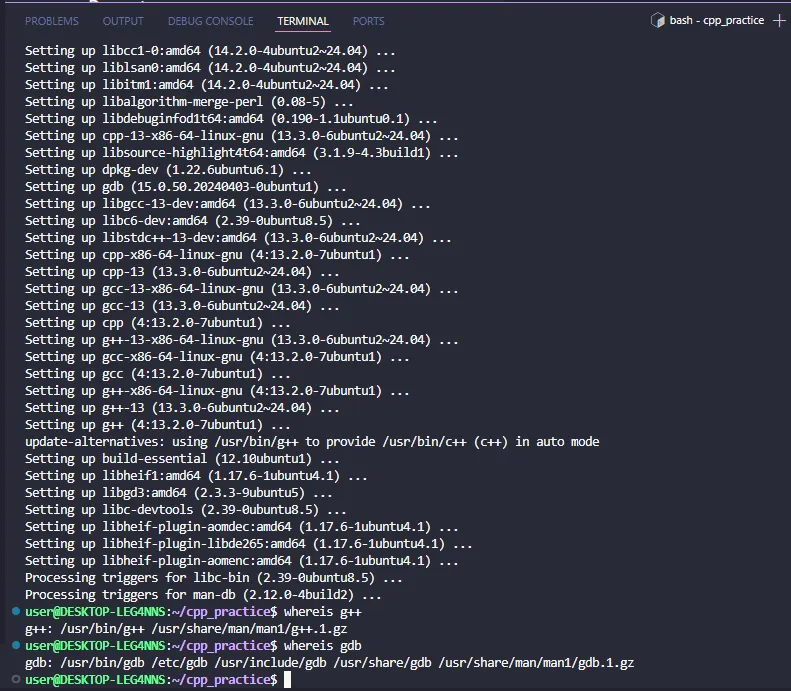
Finally adding some cpp code
Click “new file” → name of the file say name of the file say helloworld.cpp → we will see the below suggestion to add more extension pack for cpp. Again, agree/install and move on.
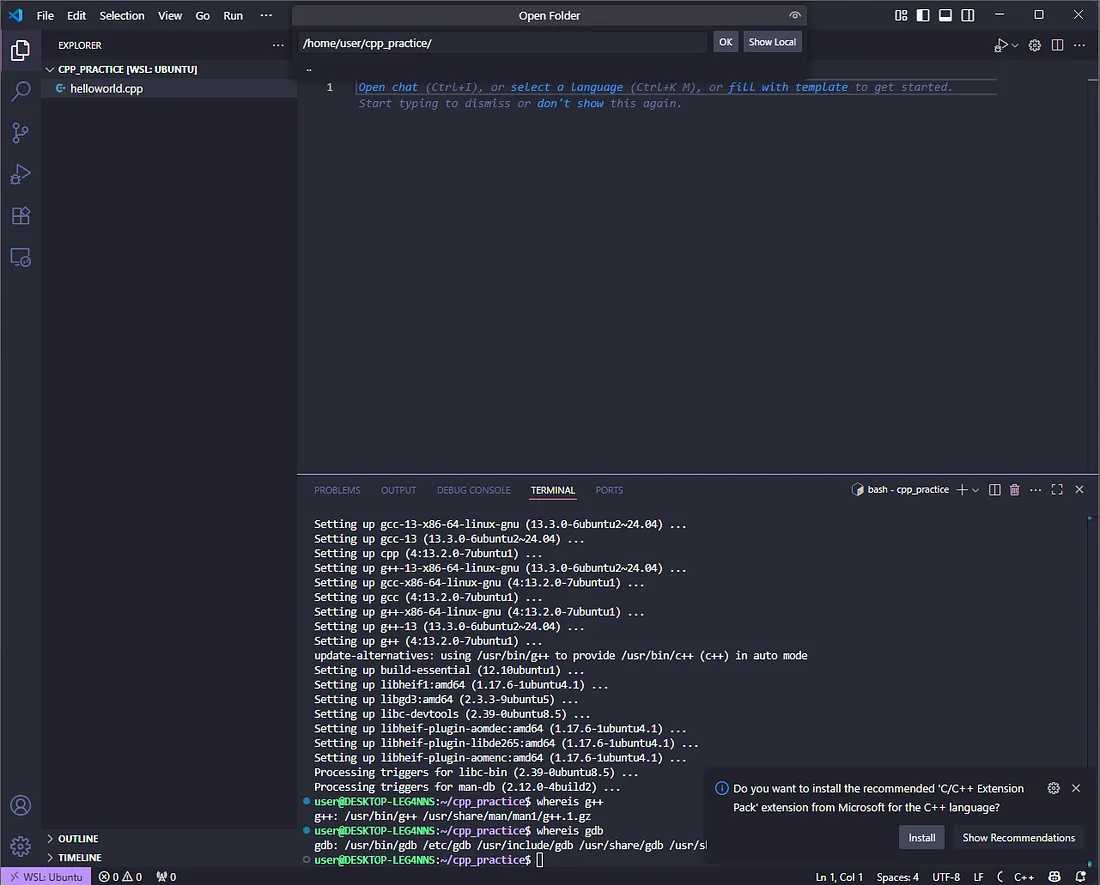
Tada, we have all the cpp avengers added too, oh my and the CMake always give me so much trouble during my lessons in the past. Never mind, in this dev log series I will try to get a better understanding of you and how you work.
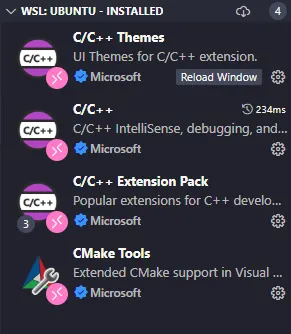
Time to add some code.
From here on, I will be following along with this documentation and see if I face any issues. I will paste the code here just for easy reference.
#include <iostream>#include <vector>#include <string>
using namespace std;
int main(){ vector<string> msg {"Hello", "C++", "World", "from", "VS Code", "and the C++ extension!"};
for (const string& word : msg) { cout << word << " "; } cout << endl;}When I first saw this code, I wondered why the Hello World looked so “extra”? Then I realised that this is to allow us to debug when there is something to loop though and test our debugger.
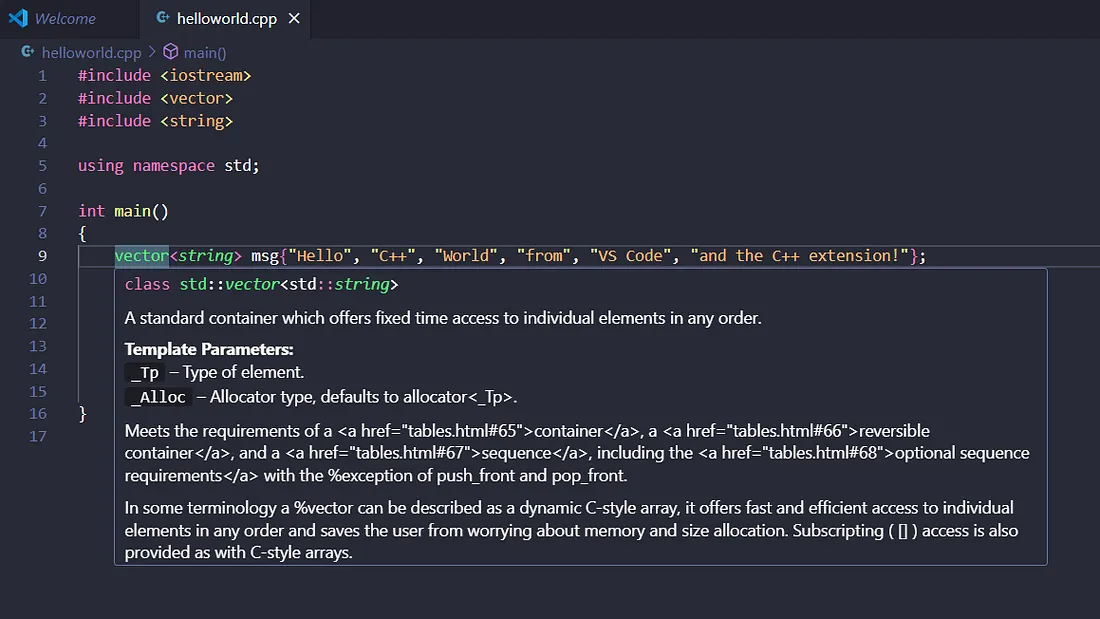
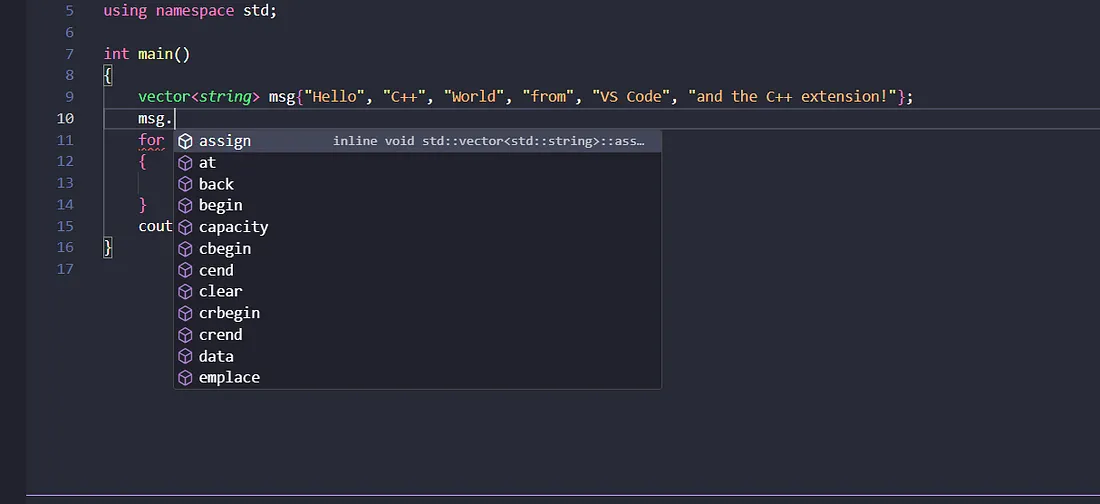
Explore IntelliSense
Hover over vector → see type info ✔
Type msg. → see autocomplete ✔
Compile and run
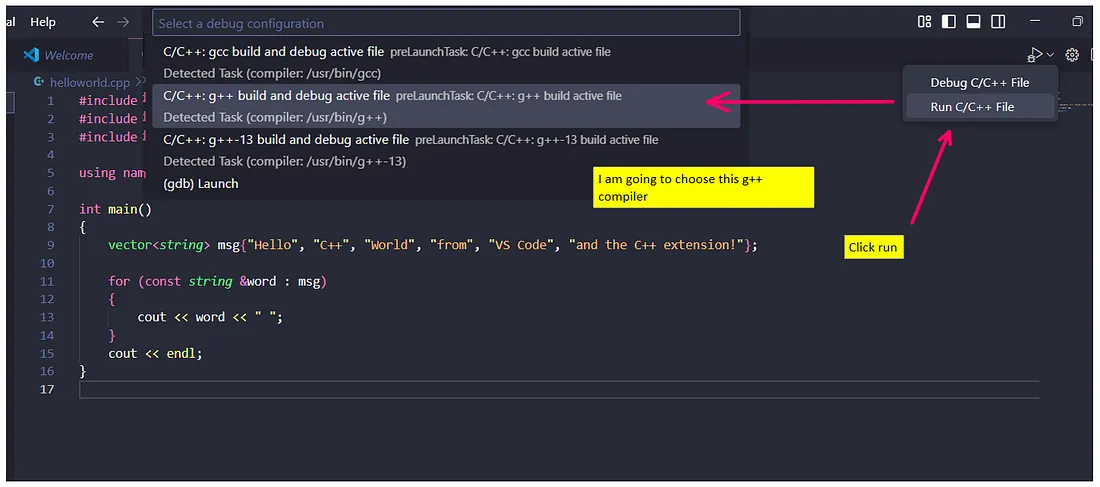
So I am going to choose g++ one without explicit call to a version, for me, it is -13 . For now, I choose g++ because it is the standard compiler for C++ code since I have no specific needs to use version -13 nor will I be using C. In that case, I would perhaps choose gcc. Although, using gcc should be fine to run these simple helloworld.cpp kind of files or practice some LeetCode problems. Nonetheless, I will just use the standard one.
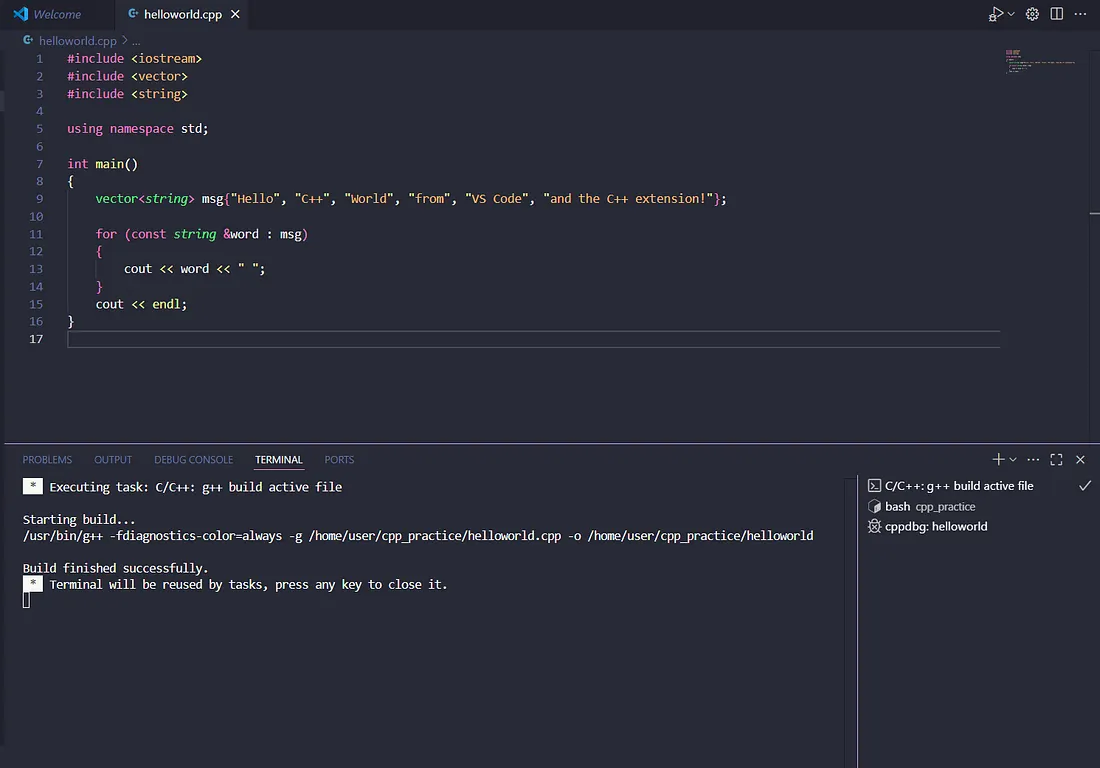
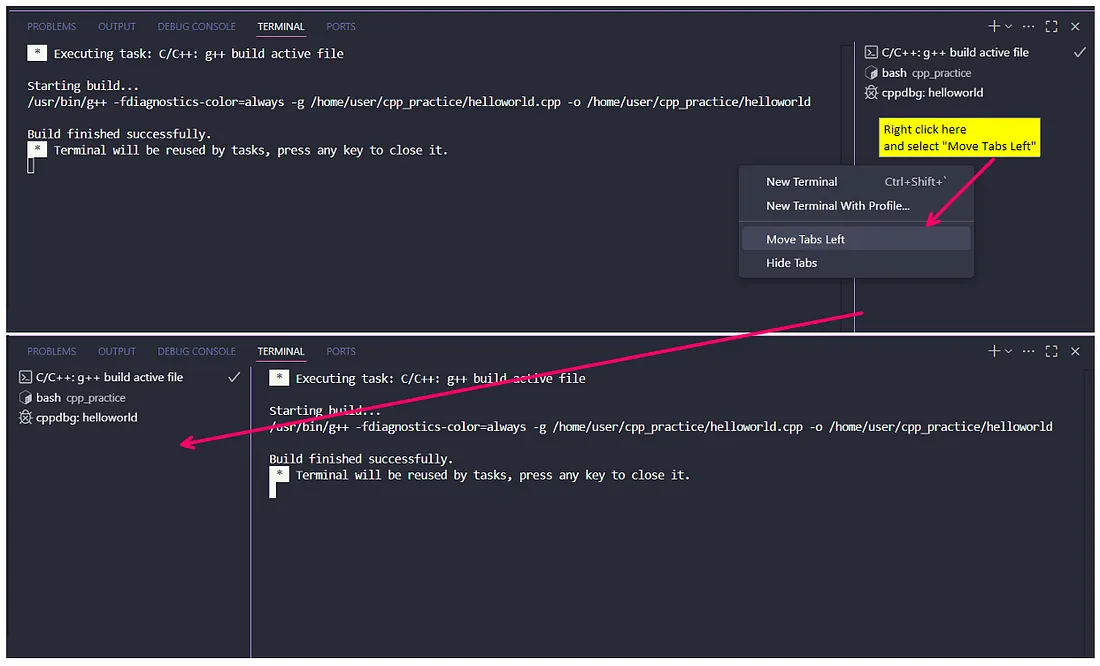
Yes its successful! But the terminal tab UI is on the right because this is the first time I setup in WSL. I prefer the terminal tab on the left, so I moved it: right-click the terminal tab → Move Tabs Left.
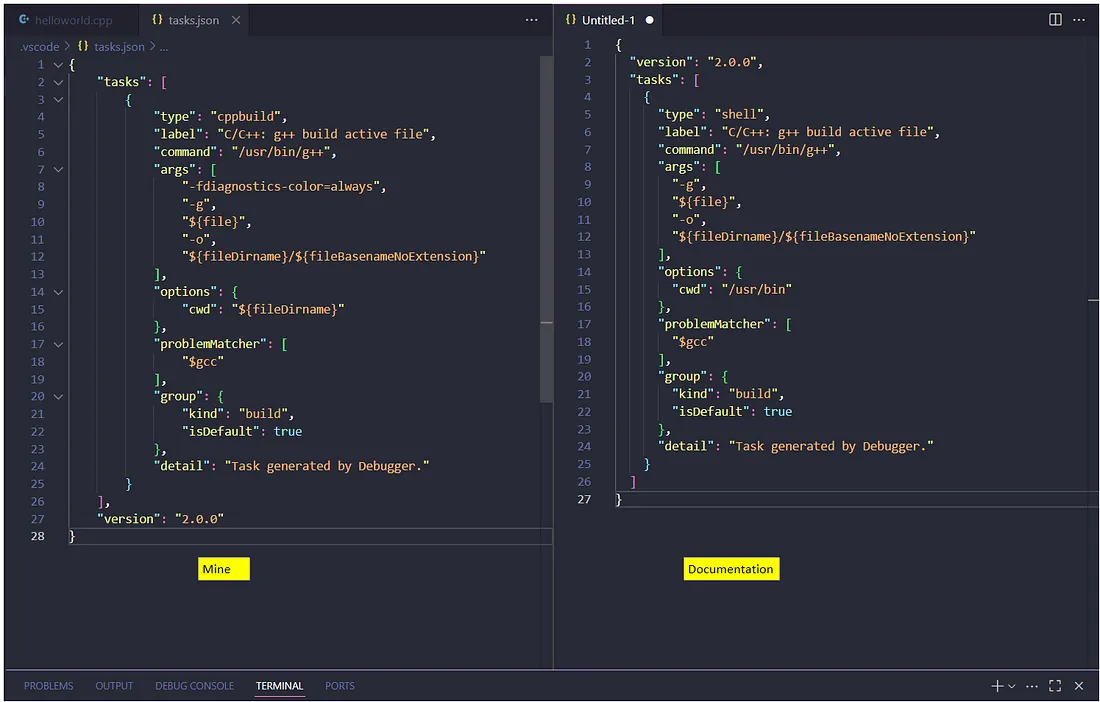
Next up would be the task.json file generated from the built. It seems like its still the same as the documentation at time of writing.
Ok, maybe now we can try breaking the code with some syntax error and see if compiler will complain? This is what we call “itchy hand”, here in Singapore. We can see that once we remove just one ‘;’, vscode already start hinting that there is an issue with different signs — just like how your other half suddenly doesn’t reply your questions, or starts giving you the black face, deep down you know you screwed something up but not sure what is it. Then you proceed to trigger your partner sorry i meant trigger the build. This is what you can see.

Sorry I meant this.
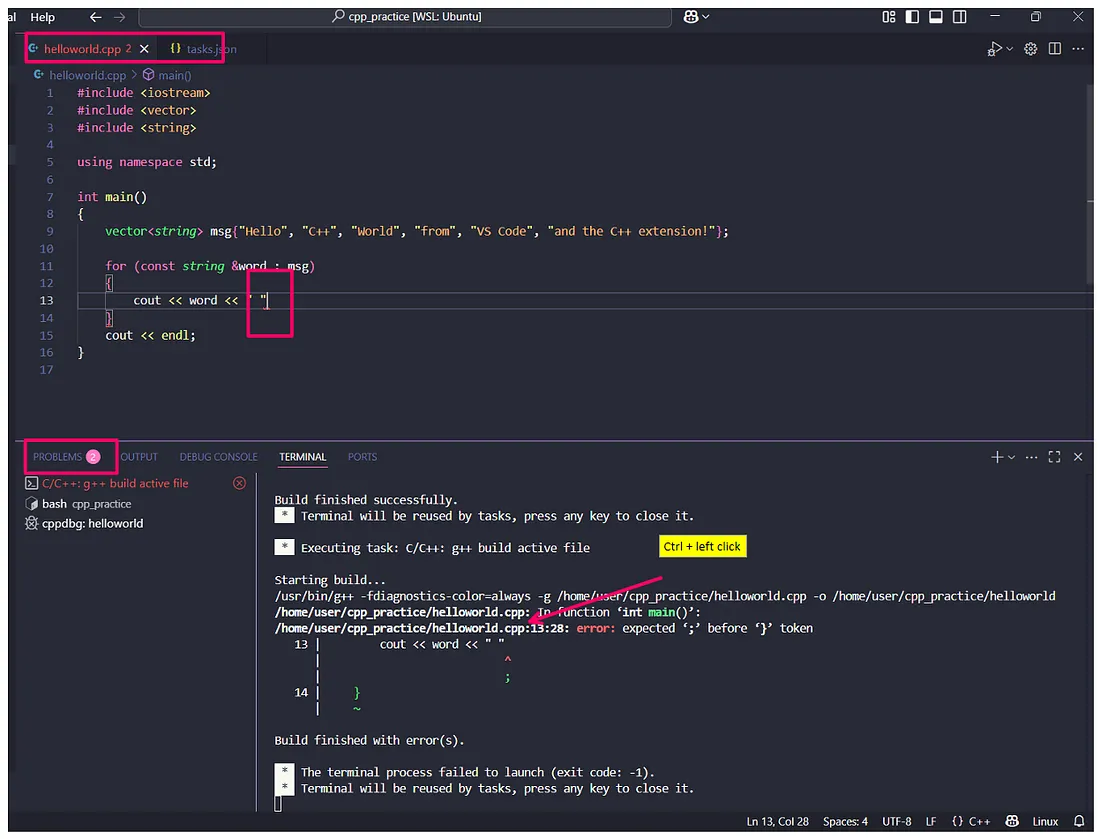
Simply Ctrl + left click will bring us to the error with clear error message, something I wish python could do better.
Debugging
Next, I will try to debug as per suggested by the document.
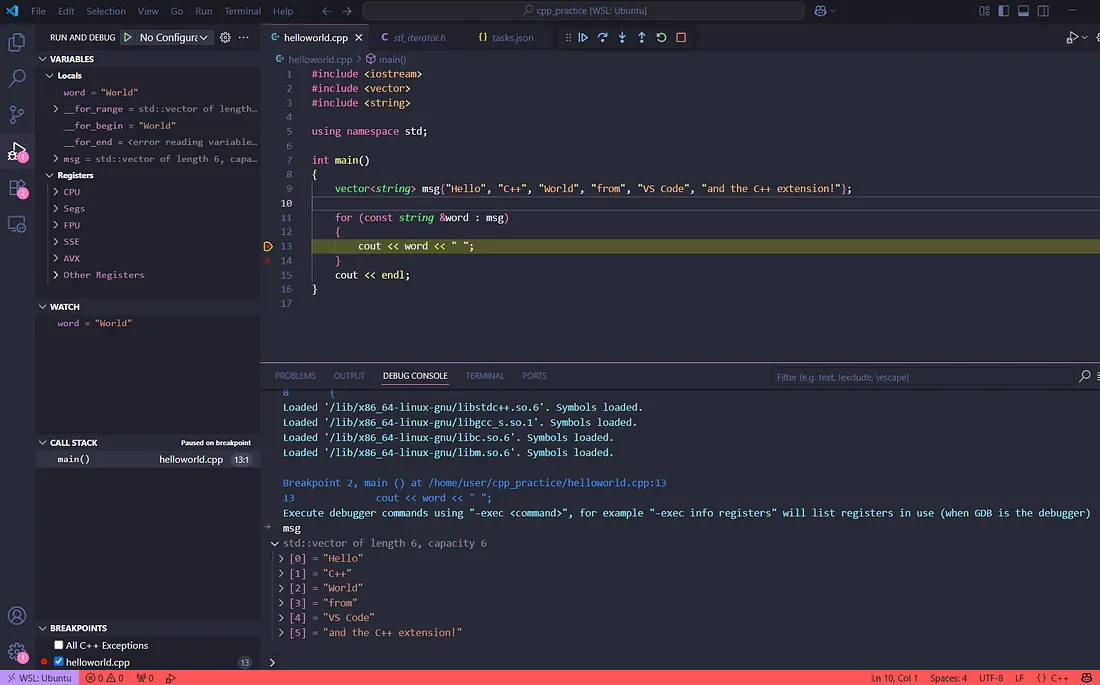
One thing to note is that register section which lets us see what value is stored where in processor. I think this could be useful when I manage to learn optimization or should I need to do assembly debugging. For now, let me just try not to get overwhelmed.
Install Git
Last but not least, install Git inside WSL so I can push my practices into my GitHub account. One important to note according to the Get started using Git on Windows Subsystem for Linux documentation, is that if we install many version of Linux then for each of the distributions be it Ubuntu or Debian for example, we will need Git installed separately in each one.
So if I open up my Ubuntu command and go to the home directory with cd ~ and type in explorer.exe . , the file explorer will open and show the windows path to access home folder.
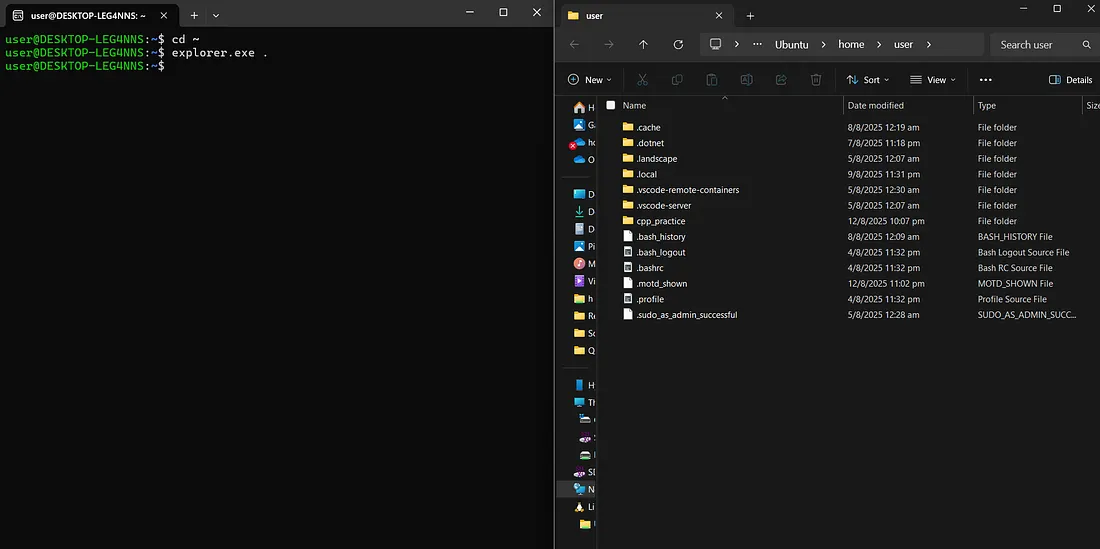
SSH
I’ll use Git with SSH. We can follow this Generating a new SSH key.
After we have created the new ssh key, we can run the following command to see our folder.
la ~/.sshNote on alias on many Linux Distribution like Ubuntu, when we start a shell, some alias are pre-defined, and we can run alias to see them. la here is just ls -a ie show all files including .ssh or any . dotfiles.

Then, we can copy the contents of public key generated and go to GitHub account > settings > SSH and GPG keys > New SSH key
If we connect with an ed25519 algorithm key, SSH might show something like:
The authenticity of host 'github.com (140.82.xx.xx)' can't be established.ED25519 key fingerprint is SHA256:+DiYpU+…something…Check the known_hosts keys
We can check GitHub’s page: if their official ED25519 fingerprint is the same, we know it’s safe to accept and add to known_hosts. This is to ensure we are connecting to, in fact, GitHub, not random servers that look like GitHub.
We can totally just replace the ssh key entries like the documentation suggest. Or we can compare the 3 to see if they are the same.
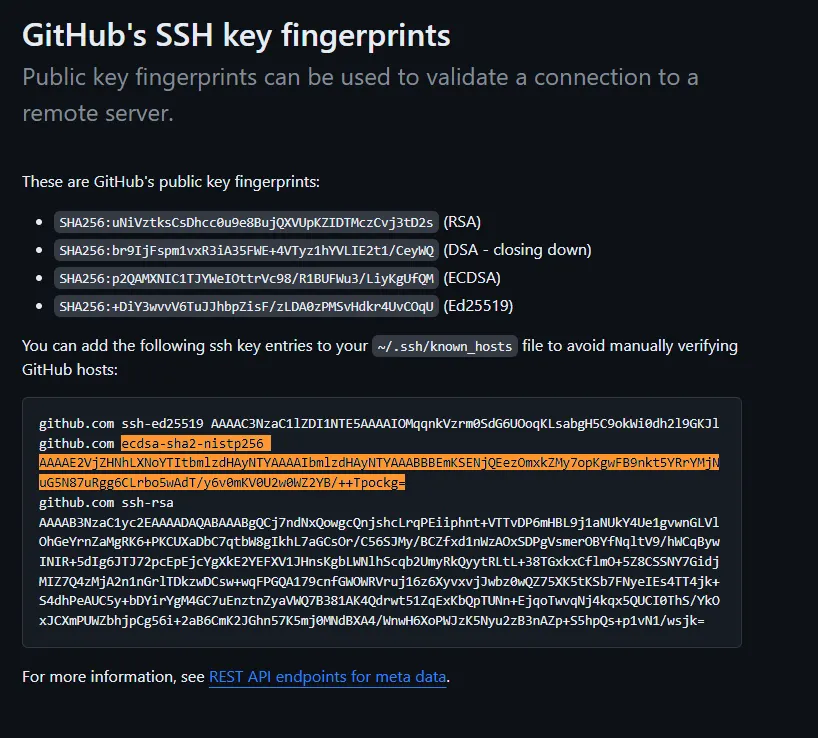
Our known_hosts could be using hashed hostnames so it may not start with github.com as per the documentation. Check the file by showing the file content with cat.
cat ~/.ssh/known_hostsThen, we can test the SSH connection to GitHub.
$ ssh -T git@github.comNow we can create our GitHub repo and do our first commit. According to the GitHub repo workflow, it suggests the following steps.
…or create a new repository on the command lineecho "# cpp_practice" >> README.mdgit initgit add README.mdgit commit -m "first commit"git branch -M maingit remote add origin git@github.com:hyunpangvictor/cpp_practice.gitgit push -u origin mainIn order to improve my CLI skills, I will try not to touch the VS Code git tab and try to use as much bash as possible.
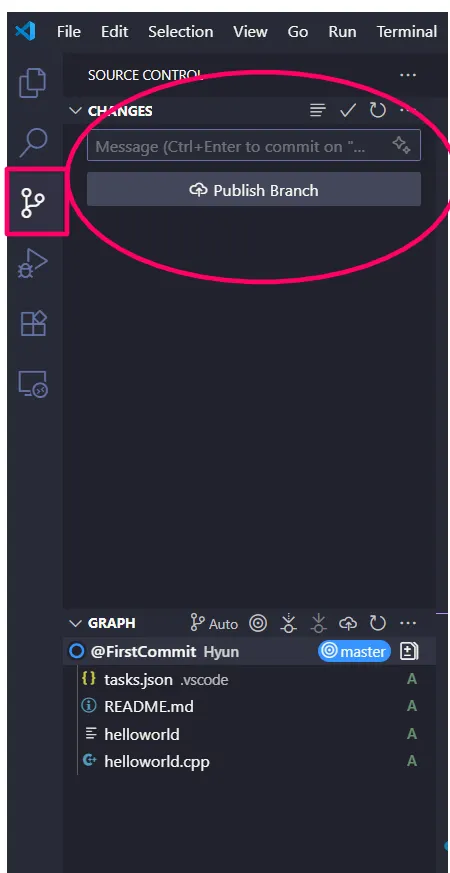
Init the Git with git init
Update the git config, I want to practice using vim, so I will be changing the default to vim or we can simply edit in the vscode with git config — global core.editor “code — wait”. Else, it will be defaulted to nano.
git config --global user.name "<Your Name>"git config --global user.email <Your Email>@gmail.comgit config --global core.editor "vim"git add . to add all the files
git commit without message to trigger the editor
Simple vim command to add commit message
- press
ito start writing - press
escto go back to navigation - type
:wqto save and quit
Yeah finally done setting up my WSL and the VS Code for practicing. Hope I will keep finding time to work on this.